The Airfield: Runway & Taxiway Build Kit
Build a proper airport runway and its taxiway, marked the way a real one is. This is a complete kit of precision runway and taxiway markings, and it comes with two things almost no other sticker set does: a printed build guide, and a ready tile shopping list so sourcing the tiles is effortless.
COMES WITH A BUILD GUIDE
A clear, printed tile map showing exactly which tiles are plain grey and which carry a sticker, and what size each one is. A marked runway is genuinely hard to work out from a loose sheet; the guide makes it obvious. You get the tile map, a picture of the finished airfield, the full sticker list and a simple build order. Nobody wants to guess.
AND A TILE SHOPPING LIST
A kit like this needs plain tiles to build the surface, so we take the work out of finding them. You get a plain shopping list AND a BrickLink wanted-list file: drag it into BrickLink's Wanted List uploader and order every tile in a couple of clicks. No counting, no working out sizes. You supply the tiles; we make buying them painless.
70 STICKERS FOR THE BUILD, PLUS 18 SPARES
These are hand-cut vinyl, and some are thin strips. So we print spares in, 18 of them, weighted to the fiddly pieces, at no extra cost to you. Cut one a little crooked and it does not matter; there is another. Build with confidence.
WHAT IT MAKES
A single paved runway (designated 09/27) with its parallel taxiway, 24 studs wide by 48 long. The runway is fully detailed: threshold "piano keys", touchdown-zone bars, single-tile aiming points, a dashed centreline dead-centre on the even-width runway, dashed edge lines, a chevron blast pad at one end and a row of approach arrows leading in to the threshold at the other. The taxiway runs the full length with proper hold-short markings, enhanced centrelines and RUNWAY AHEAD / 09-27 holding signs at the two links, the points where you get on and off the runway. A segmented circle marks the circuit direction, the detail that says an aviation person made this.
Every marking is designed to sit on separate tiles and still line up: the lines are dashed and the blocks sit on single tiles, so a tiny gap between tiles never shows as a kink. It reads crisp and deliberate, not fiddly.
It is deliberately the airside half of a bigger airfield, the runway and the taxiway that serves it. The landside (aprons, hangars, a control tower) is your own MOC to build around it, so the kit spends its stickers where they earn their keep: on markings, not on plain pavement.
PRINTED TO DISAPPEAR INTO THE TARMAC
The white and yellow markings are printed on a dark-grey background that matches LEGO® Dark Bluish Grey. On a grey tile the surround vanishes and you see only the crisp marking, no white edge, no border, just the line sitting on the tarmac. Every sticker is precision-sized slightly smaller than the tile, so it sits inside the tile's bevel and reads as painted-on, not stuck-on.
WHAT YOU GET
- Three printed A4 sheets of self-adhesive vinyl markings - 70 for the build plus 18 spares
- A printed build guide (the tile map, the finished airfield, the sticker list and how to build it)
- A tile shopping list plus a BrickLink wanted-list file, so you can order the tiles in one go
- You cut each sticker out yourself - they are NOT supplied pre-cut - then peel and apply
- Tile-size labels printed on the sheets, so you always know which tile a marking is for
- Compatible with LEGO® and other leading building-brick systems
WHAT YOU'LL NEED TO BUILD IT
Plain tiles to build the surface: about 111 dark bluish grey tiles for the runway and taxiway, four small green tiles for the signs, and a green baseplate for the grass. The included shopping list and BrickLink file cover all of it. You supply the tiles; the stickers and the guide do the rest.
CUTTING & APPLYING - A QUICK HOW-TO
- Cut each marking out with small, sharp craft scissors, or a craft knife against a steel rule for the crispest straight edges
- Cut just inside the printed border so no edge shows, then peel and place
- Apply each sticker to its tile OFF the model, then drop the finished tile into place, far easier to line up
- Take your time with the thin strips, and remember, you have spares
LEGO® is a trademark of the LEGO Group, which does not sponsor, authorise or endorse this product. This is not a LEGO® product.
Build a proper airport runway and its taxiway, marked the way a real one is. This is a complete kit of precision runway and taxiway markings, and it comes with two things almost no other sticker set does: a printed build guide, and a ready tile shopping list so sourcing the tiles is effortless.
COMES WITH A BUILD GUIDE
A clear, printed tile map showing exactly which tiles are plain grey and which carry a sticker, and what size each one is. A marked runway is genuinely hard to work out from a loose sheet; the guide makes it obvious. You get the tile map, a picture of the finished airfield, the full sticker list and a simple build order. Nobody wants to guess.
AND A TILE SHOPPING LIST
A kit like this needs plain tiles to build the surface, so we take the work out of finding them. You get a plain shopping list AND a BrickLink wanted-list file: drag it into BrickLink's Wanted List uploader and order every tile in a couple of clicks. No counting, no working out sizes. You supply the tiles; we make buying them painless.
70 STICKERS FOR THE BUILD, PLUS 18 SPARES
These are hand-cut vinyl, and some are thin strips. So we print spares in, 18 of them, weighted to the fiddly pieces, at no extra cost to you. Cut one a little crooked and it does not matter; there is another. Build with confidence.
WHAT IT MAKES
A single paved runway (designated 09/27) with its parallel taxiway, 24 studs wide by 48 long. The runway is fully detailed: threshold "piano keys", touchdown-zone bars, single-tile aiming points, a dashed centreline dead-centre on the even-width runway, dashed edge lines, a chevron blast pad at one end and a row of approach arrows leading in to the threshold at the other. The taxiway runs the full length with proper hold-short markings, enhanced centrelines and RUNWAY AHEAD / 09-27 holding signs at the two links, the points where you get on and off the runway. A segmented circle marks the circuit direction, the detail that says an aviation person made this.
Every marking is designed to sit on separate tiles and still line up: the lines are dashed and the blocks sit on single tiles, so a tiny gap between tiles never shows as a kink. It reads crisp and deliberate, not fiddly.
It is deliberately the airside half of a bigger airfield, the runway and the taxiway that serves it. The landside (aprons, hangars, a control tower) is your own MOC to build around it, so the kit spends its stickers where they earn their keep: on markings, not on plain pavement.
PRINTED TO DISAPPEAR INTO THE TARMAC
The white and yellow markings are printed on a dark-grey background that matches LEGO® Dark Bluish Grey. On a grey tile the surround vanishes and you see only the crisp marking, no white edge, no border, just the line sitting on the tarmac. Every sticker is precision-sized slightly smaller than the tile, so it sits inside the tile's bevel and reads as painted-on, not stuck-on.
WHAT YOU GET
- Three printed A4 sheets of self-adhesive vinyl markings - 70 for the build plus 18 spares
- A printed build guide (the tile map, the finished airfield, the sticker list and how to build it)
- A tile shopping list plus a BrickLink wanted-list file, so you can order the tiles in one go
- You cut each sticker out yourself - they are NOT supplied pre-cut - then peel and apply
- Tile-size labels printed on the sheets, so you always know which tile a marking is for
- Compatible with LEGO® and other leading building-brick systems
WHAT YOU'LL NEED TO BUILD IT
Plain tiles to build the surface: about 111 dark bluish grey tiles for the runway and taxiway, four small green tiles for the signs, and a green baseplate for the grass. The included shopping list and BrickLink file cover all of it. You supply the tiles; the stickers and the guide do the rest.
CUTTING & APPLYING - A QUICK HOW-TO
- Cut each marking out with small, sharp craft scissors, or a craft knife against a steel rule for the crispest straight edges
- Cut just inside the printed border so no edge shows, then peel and place
- Apply each sticker to its tile OFF the model, then drop the finished tile into place, far easier to line up
- Take your time with the thin strips, and remember, you have spares
LEGO® is a trademark of the LEGO Group, which does not sponsor, authorise or endorse this product. This is not a LEGO® product.

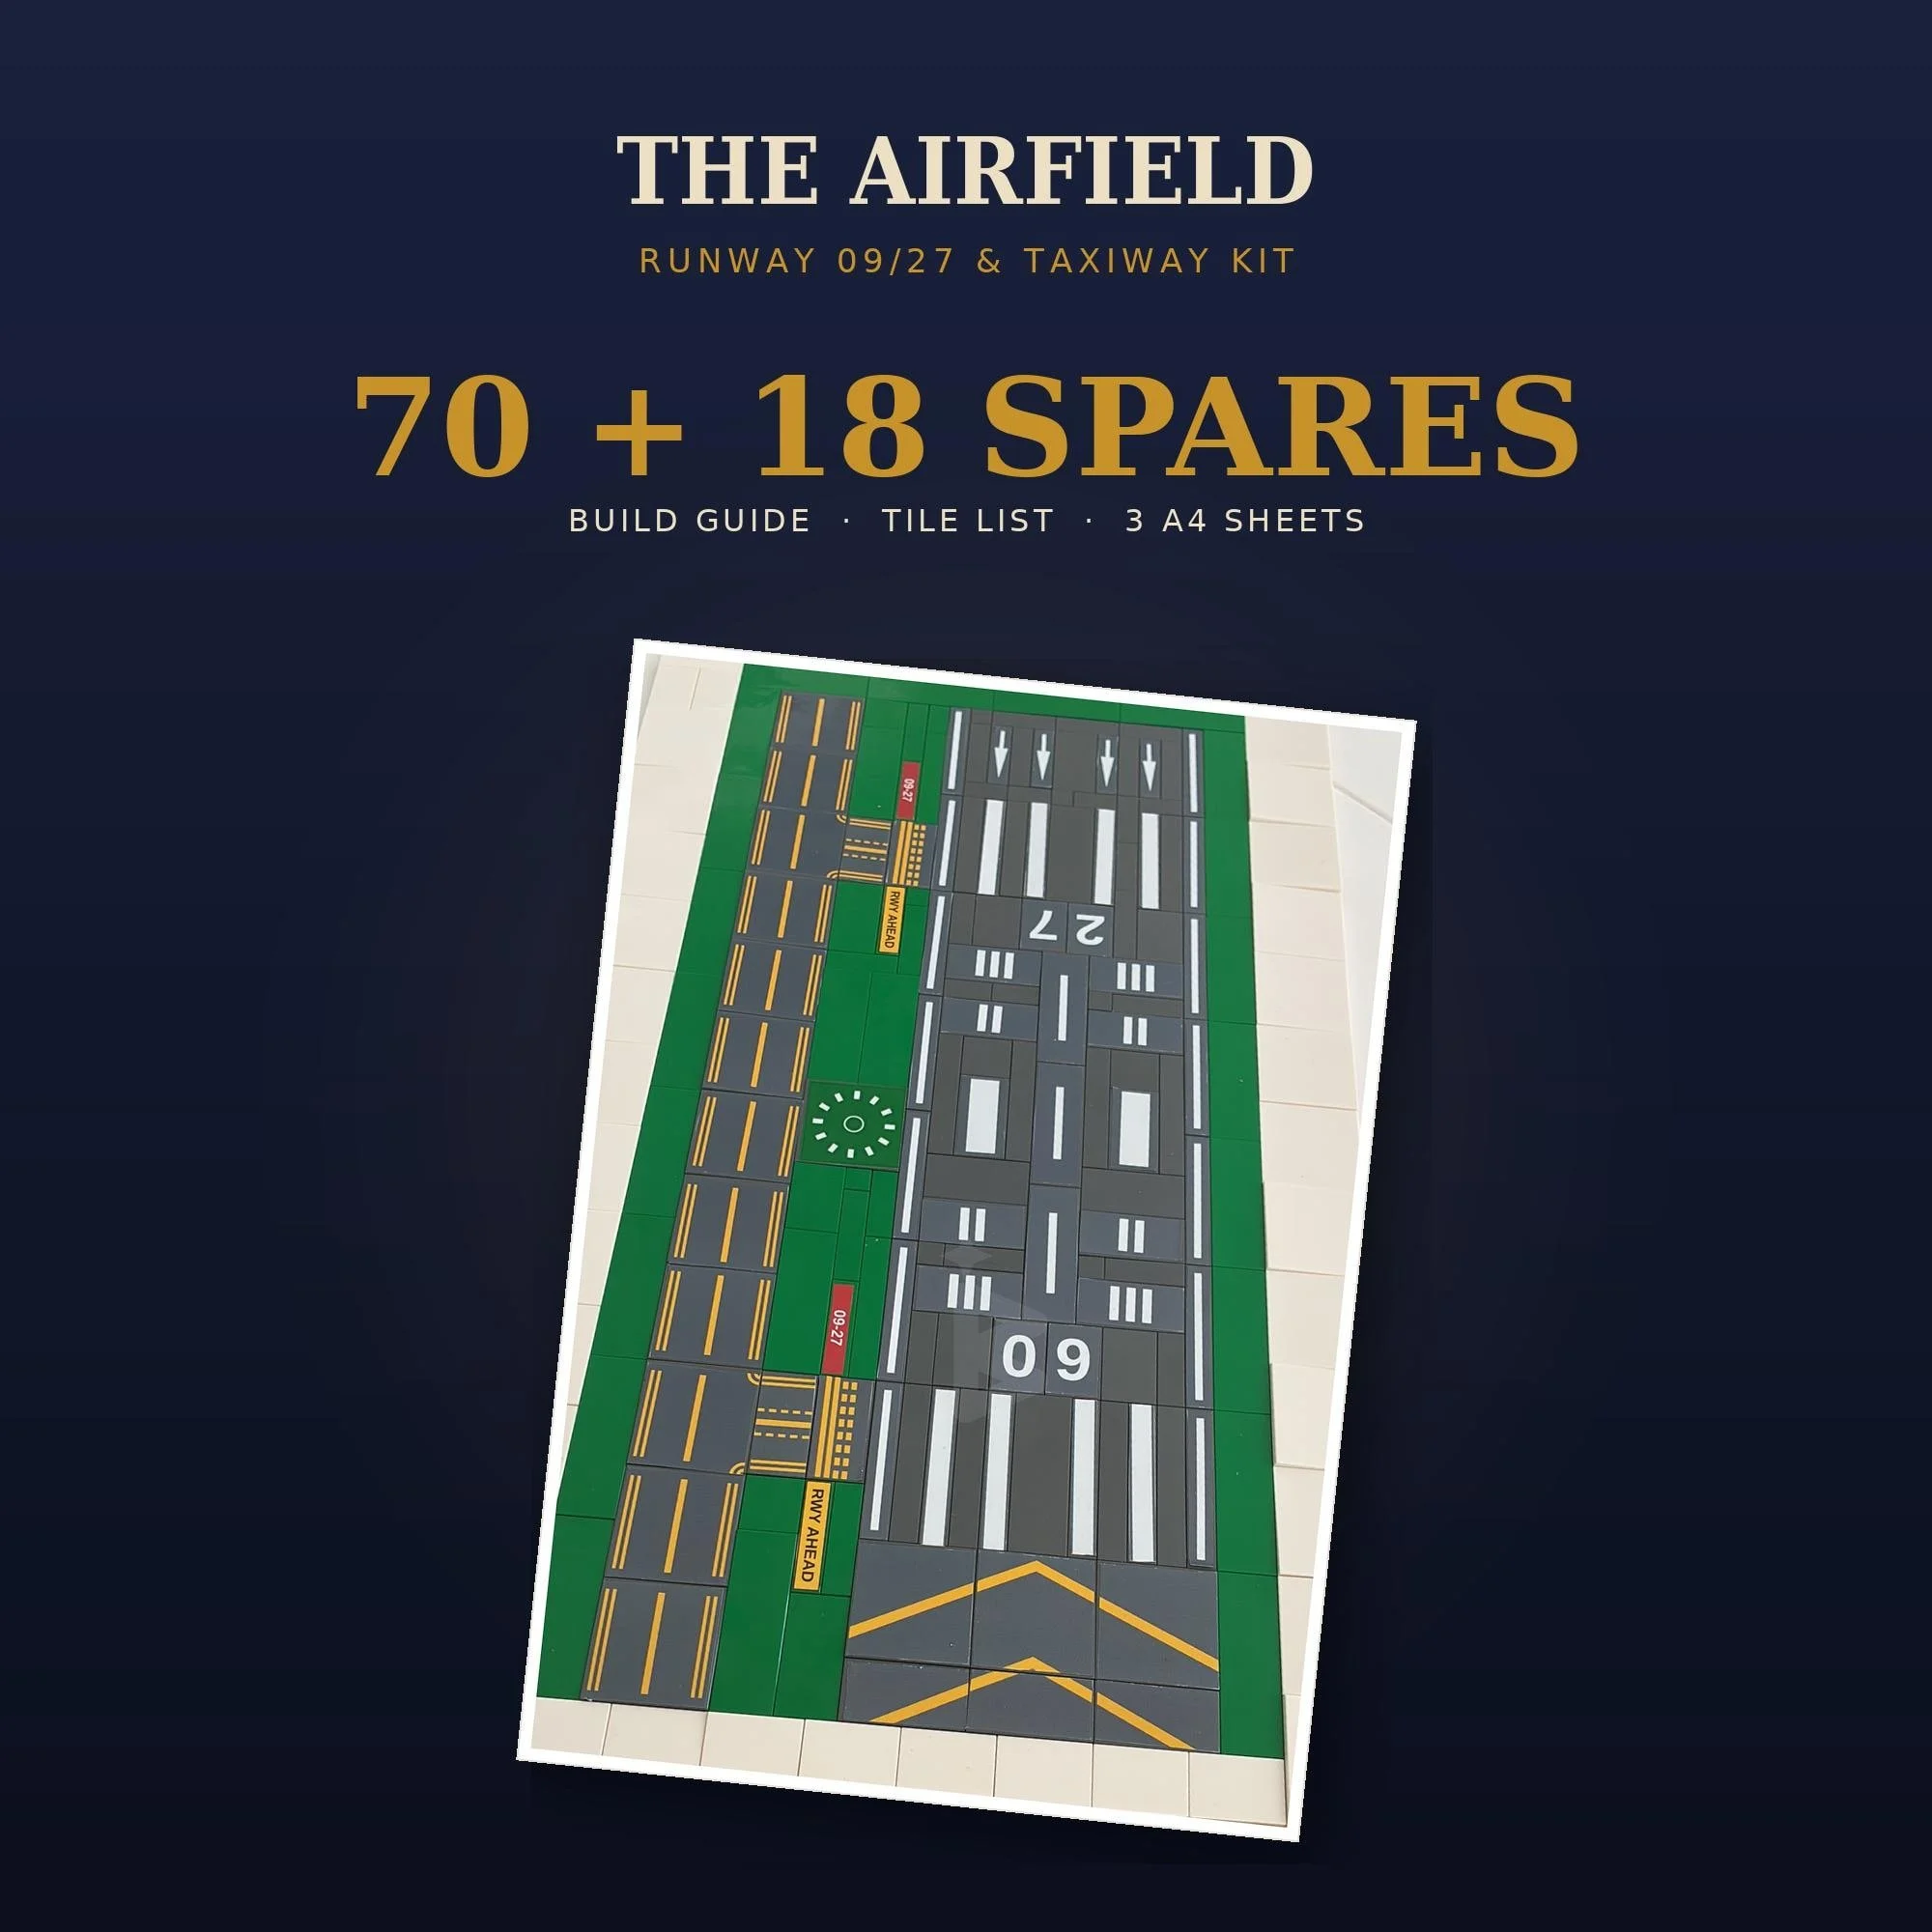 Image 1 of 5
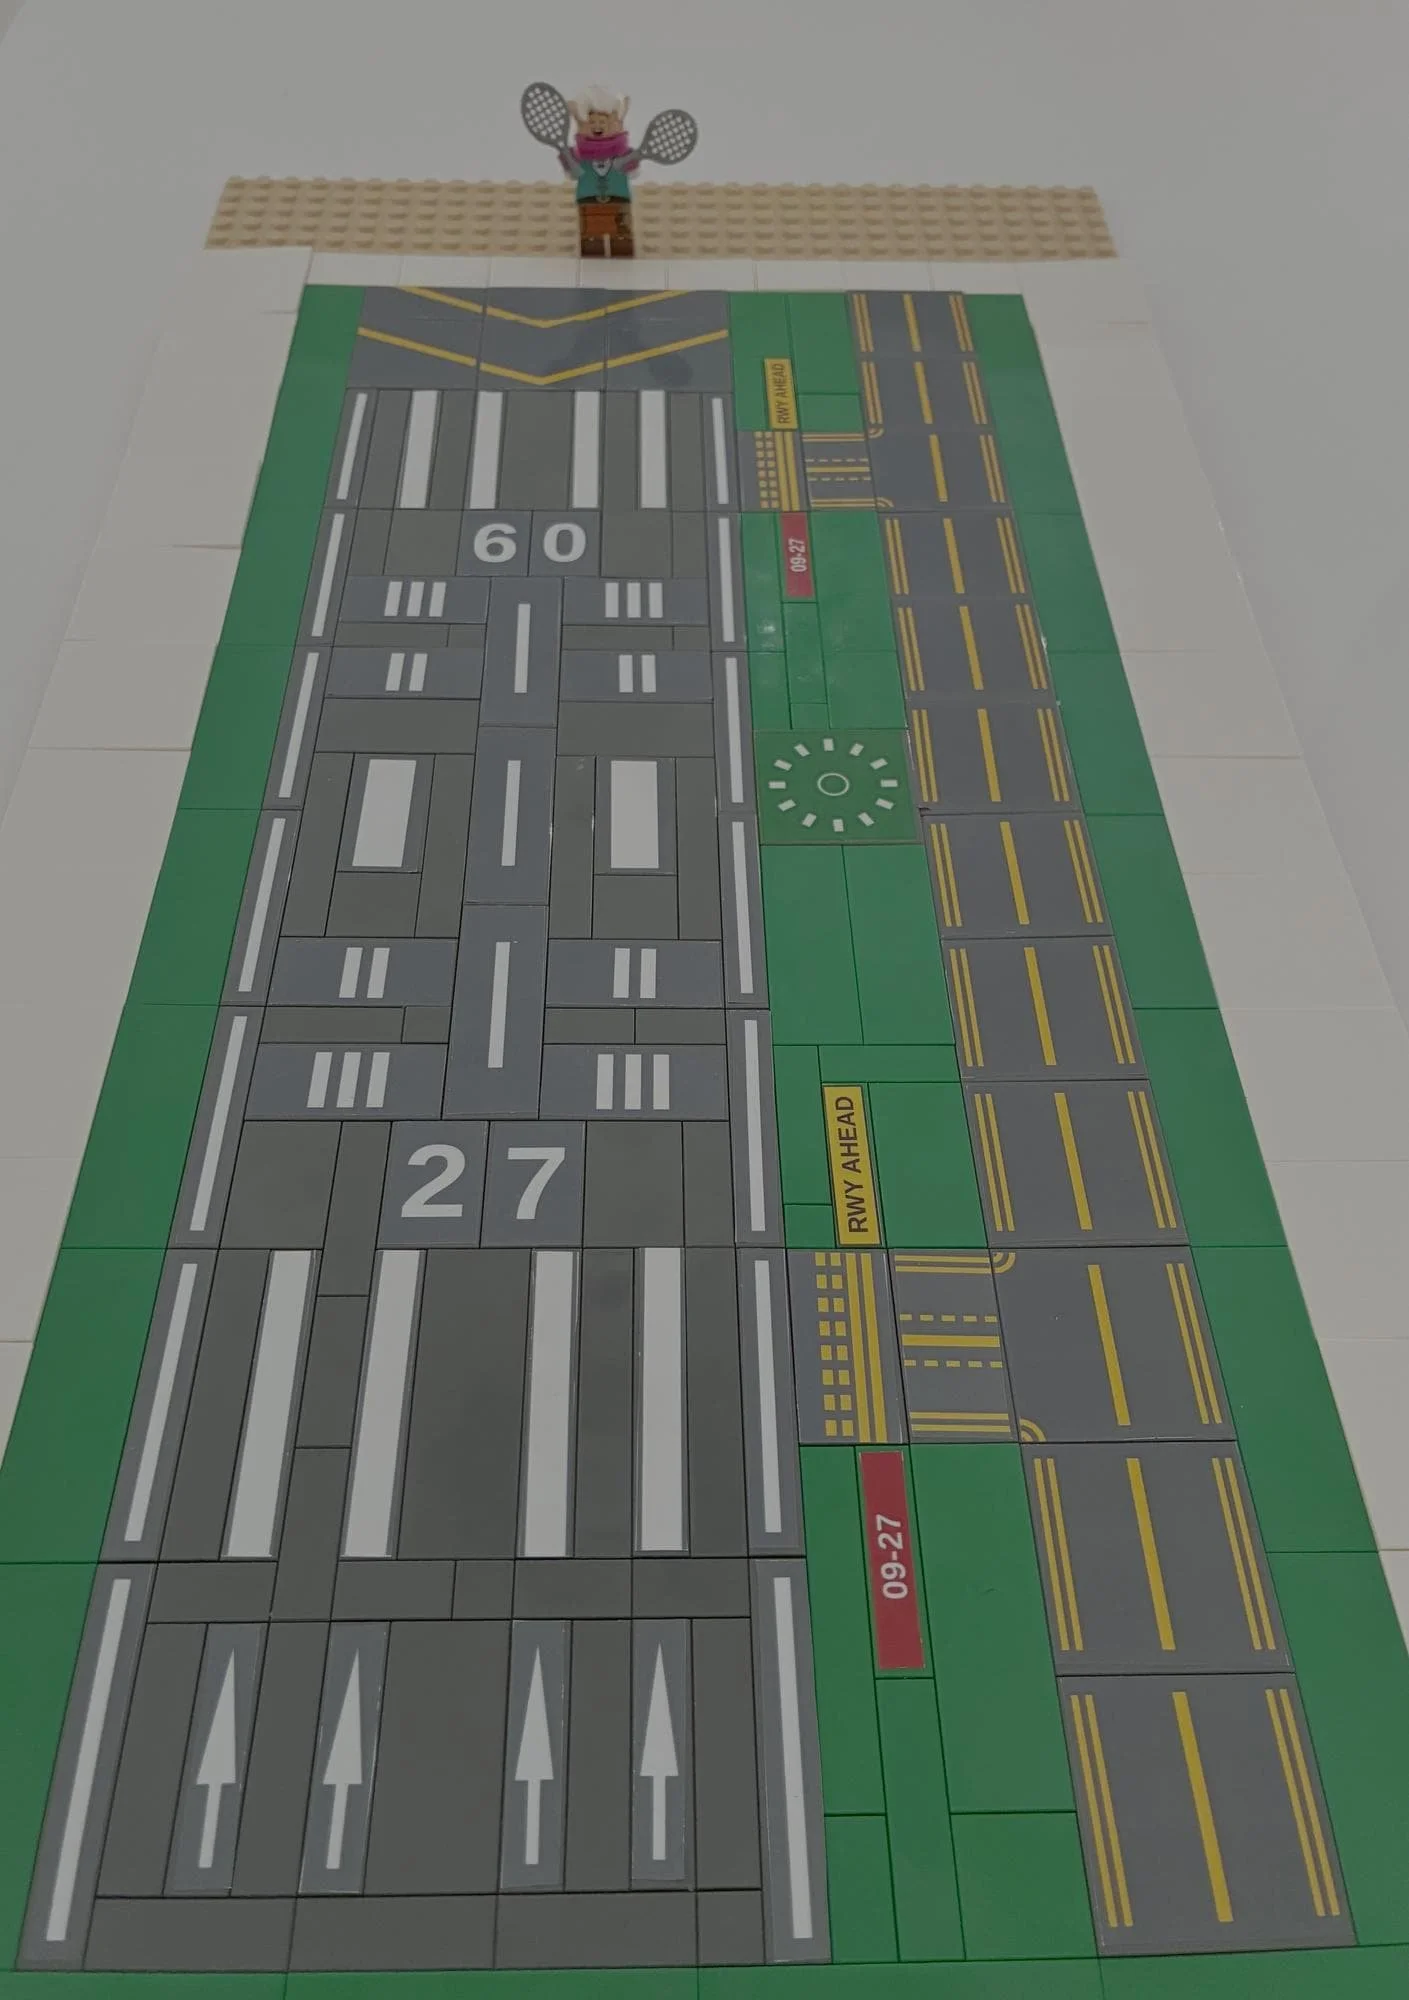 Image 2 of 5
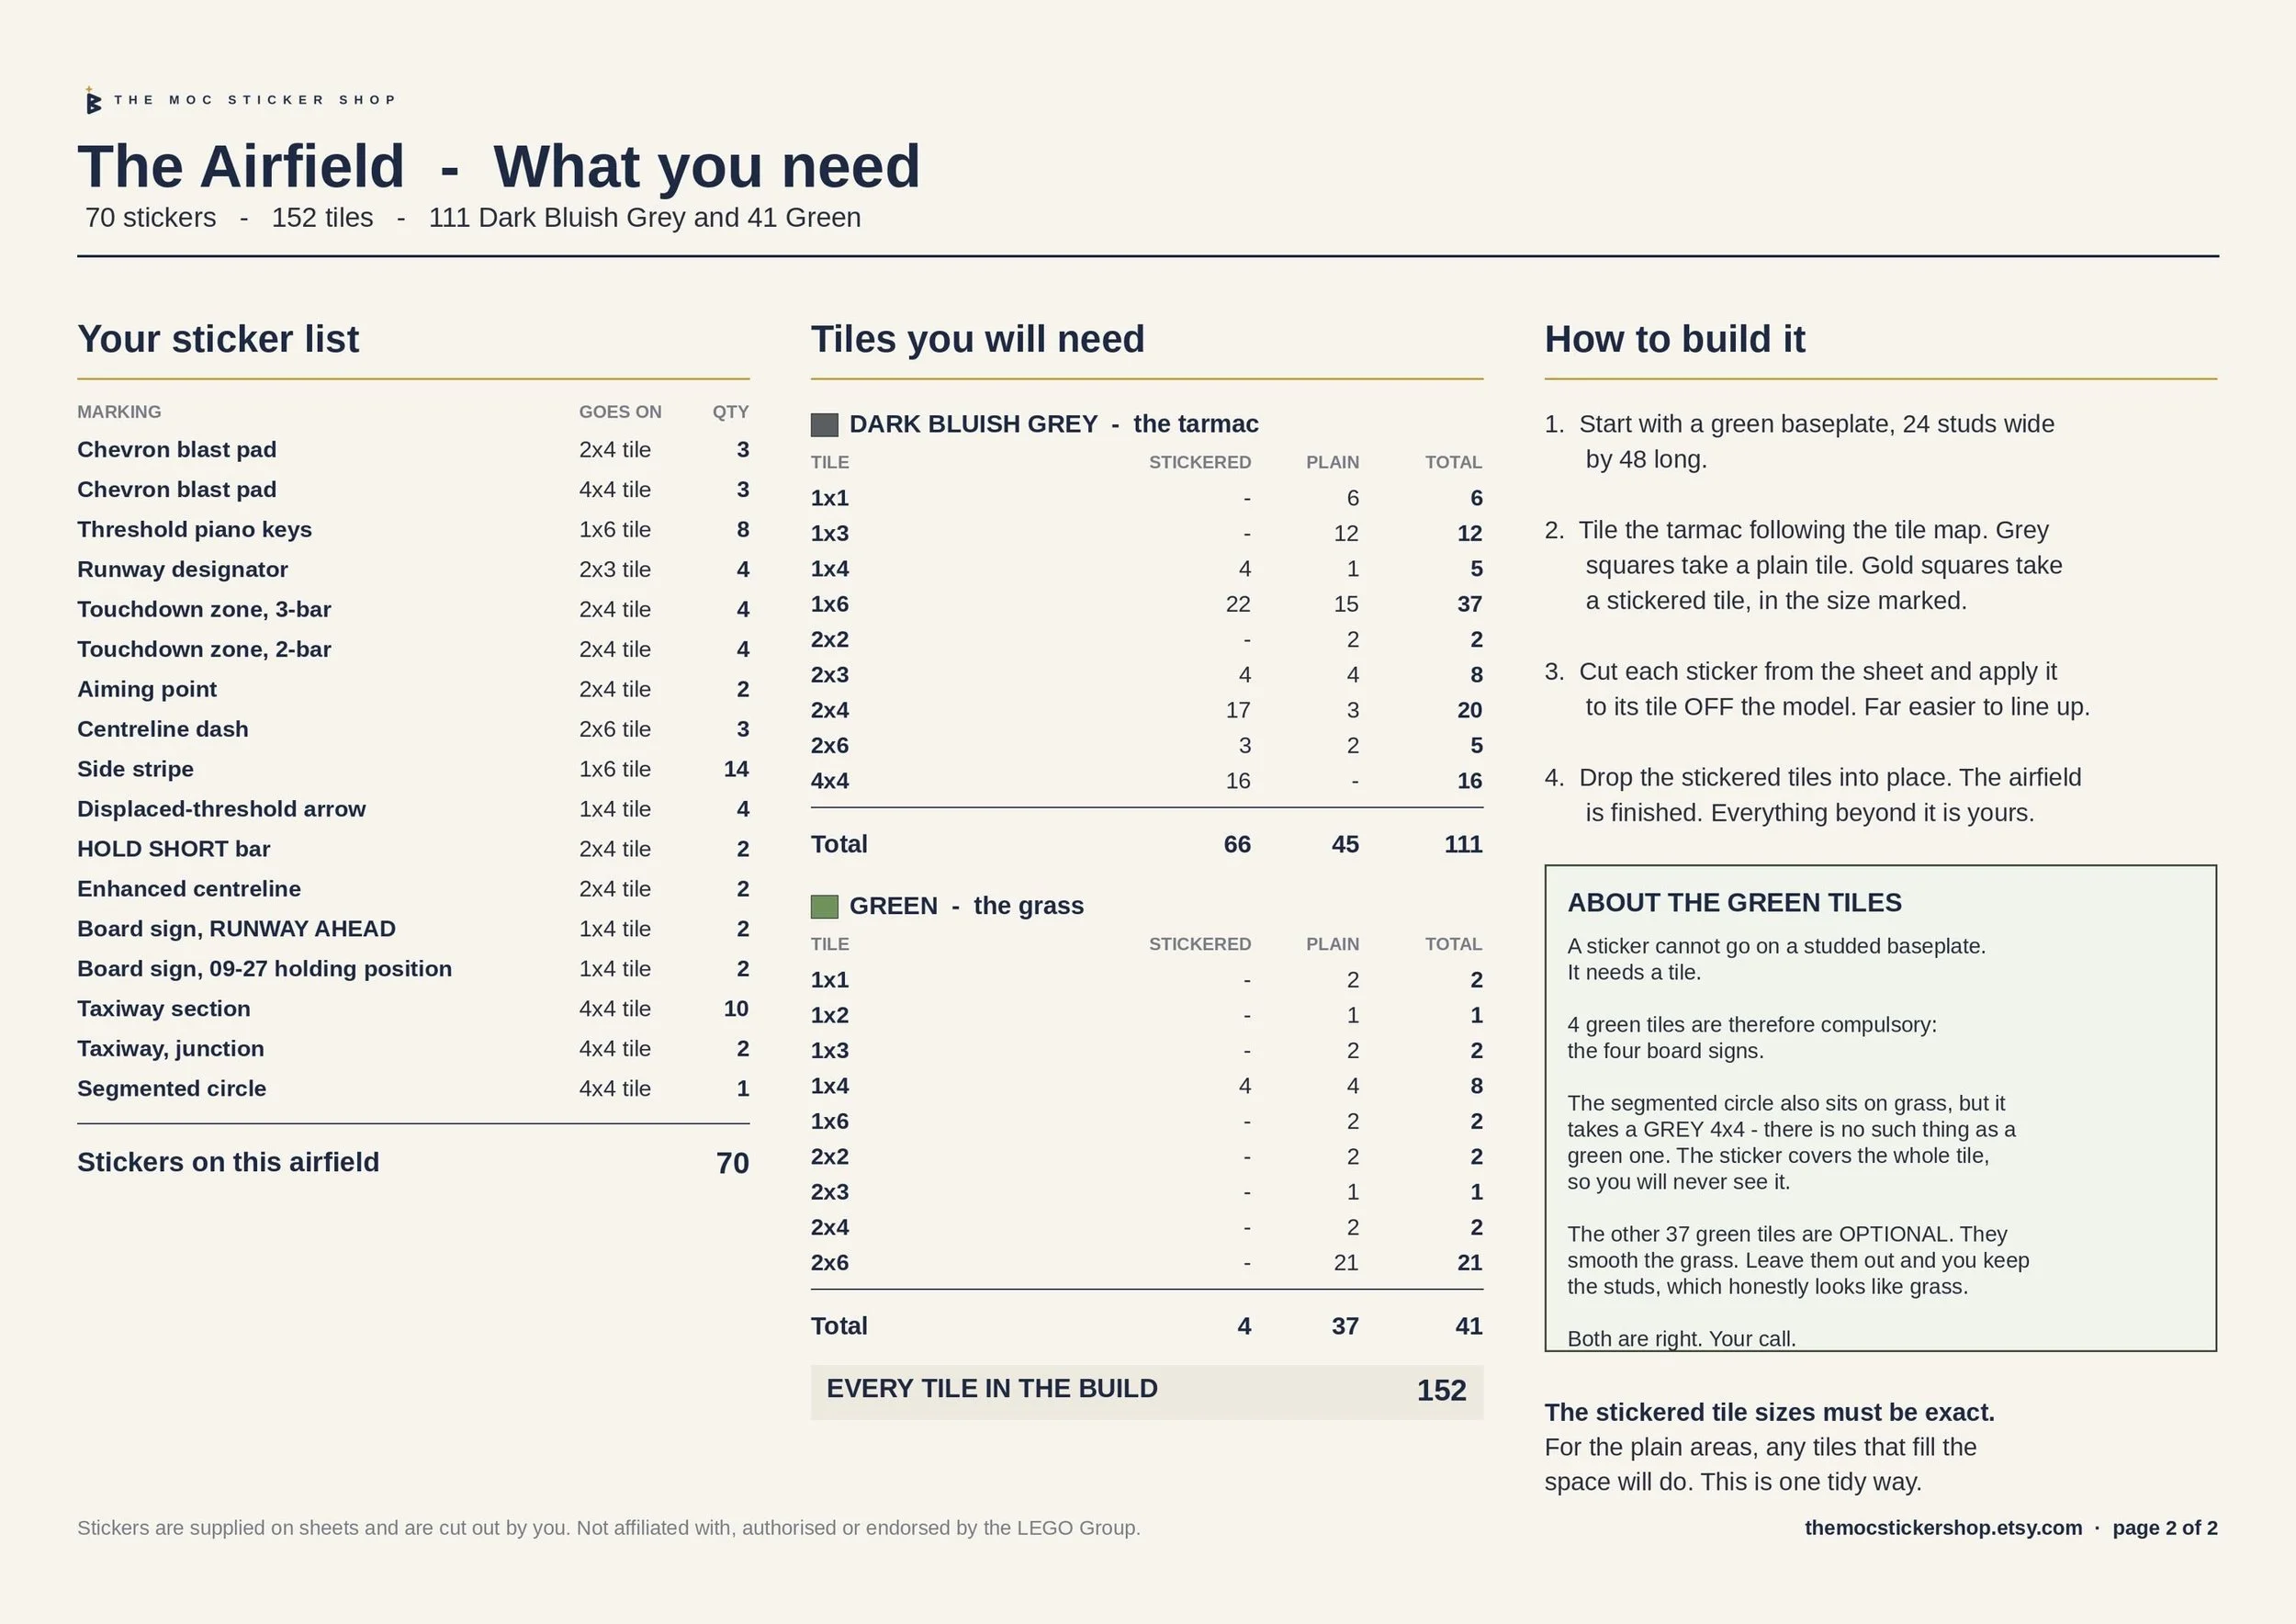 Image 3 of 5
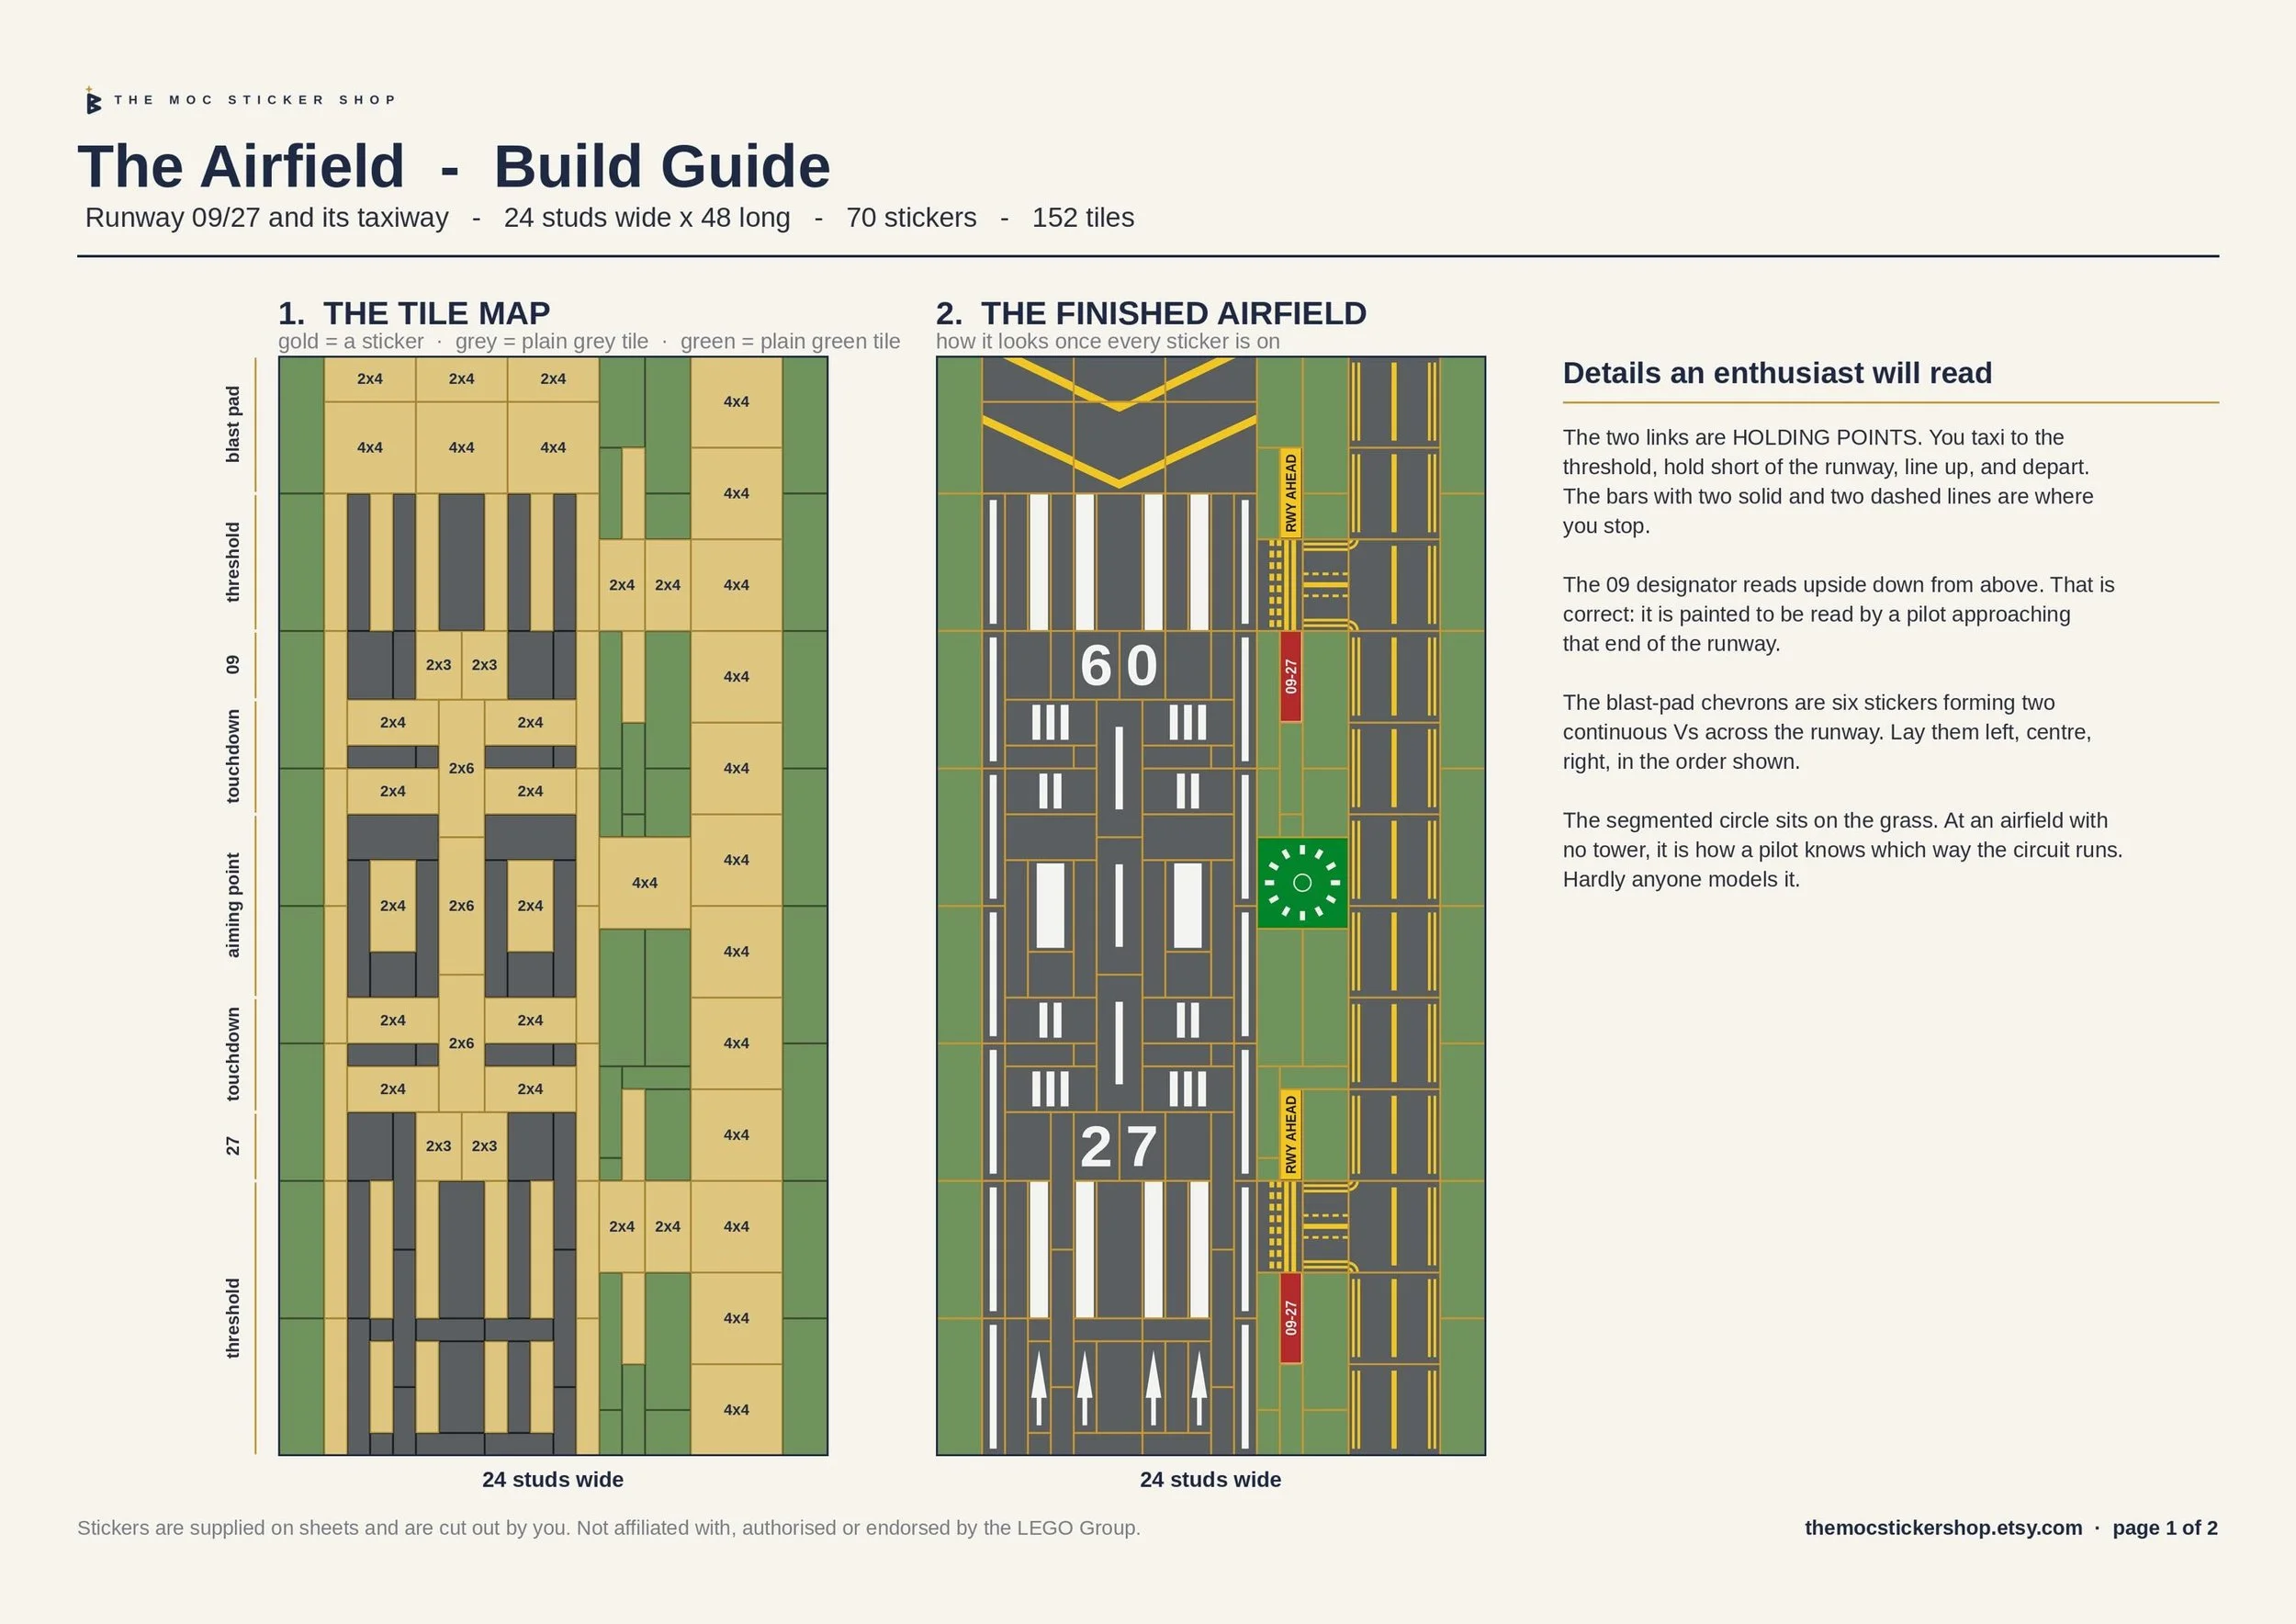 Image 4 of 5
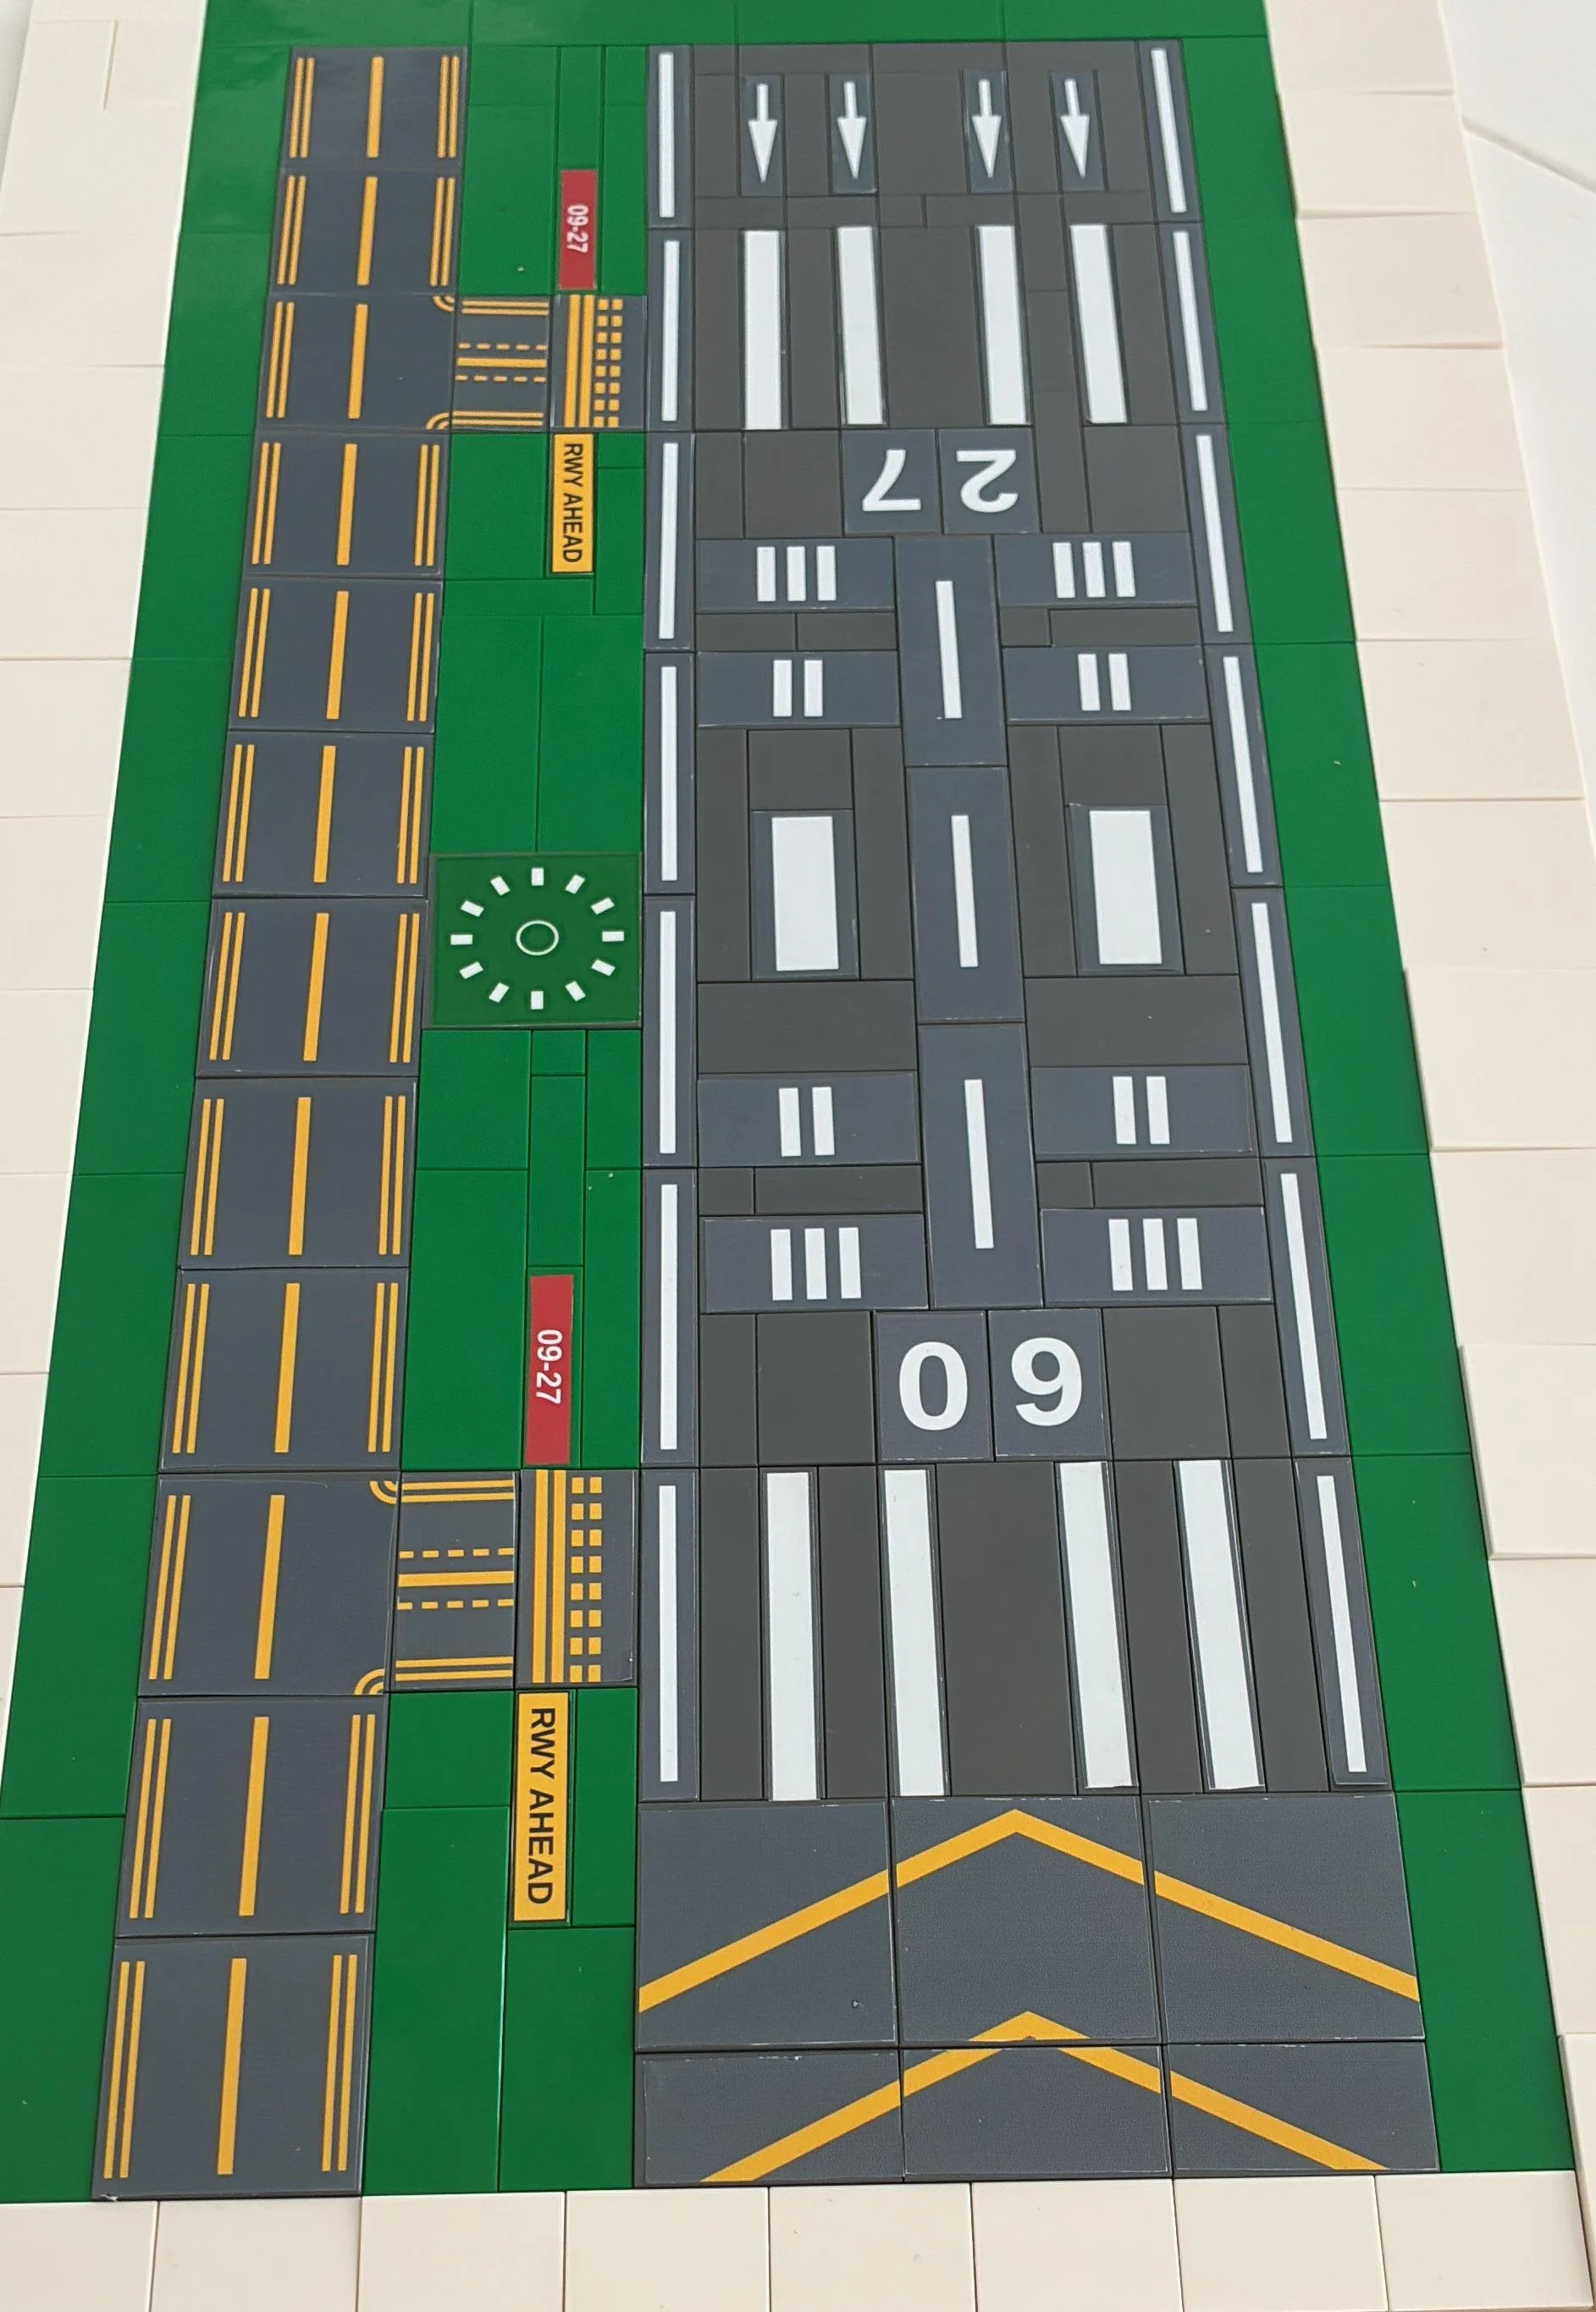 Image 5 of 5